— Schedule-based Recording with Motion Detection — Confirm Recording Enabled —
Setup Schedule-based Recording with Motion Detection
In the case of
schedule-based recording with motion detection — motion detection is turned on, but the analysis is not used to determine whether or not to archive the video. Motion information is encoded into the continuous stream of archived video, indicating if motion was detected in each frame — and if so, how much motion was detected. This information is used during
replay allowing the user to see when
motion occurred, as well as skip over all
motionless video at the click of a button.
Turning on recording requires at least one schedule to be added and configured for the camera.
Confirm that recording is enabled for the camera —
- In the NVR Control Center — Cameras select a camera from the Cameras List.
- In the Cameras Settings ensure that the Exclude from recording checkbox is unchecked and the Recording tab is visible.
- Continue to Setup Recording Schedule

- When a schedule has motion detection enabled, the Motion Settings become available to the user. These settings are not required, but can be used to optimize motion detection for each individual camera and its environment. Learn more in Adjust Motion Settings section.
— Schedule-based Recording with Motion Detection — Setup Recording Schedule & Video Quality —
Setup Schedule-based Recording with Motion Detection
Setup a recording schedule to the selected camera —
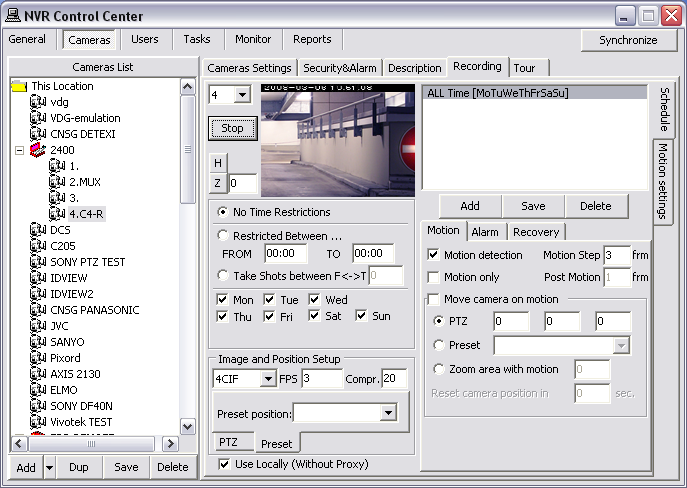
- Switch to the Recording.
- Click Add button under the blank Schedule list to add a new recording schedule.
- Leave No Time Restrictions radio button selected, and leave all days of the week checkboxes checked to configure a 24/7 continuous schedule;
— or —
Select the Restricted Between radio button and define a time range FROM - TO and
leave proper days of the week checked to have the schedule repeated these days only.
- To setup video quality under the Image and Position Setup —
- Select Resolution from the drop-down list the video will be recorded at. Higher resolution means better image quality, and larger file size (4CIF on the sample).
- Enter FPS — the number of frames per second that will be archived. Higher FPS means more fluid motion, and larger file size (3 on the sample).
- Enter Compression % which will be applied to the video before it is archived. Lower compression percentage means better image quality, and larger file size (20 on the sample).
- Continue to Setup Motion Detection.
- After saving the schedule, it will be named based on the settings defined within it.
- Defining a recording schedule at a specific resolution, FPS and compression may affect live video streams from this camera — depending on whether the camera supports simultaneous video streams with different parameters such as this. Check the specifications of the camera in use.
— Continuous Recording with Motion Detection — Setup Motion Detection —
Setup Schedule-based Recording with Motion Detection
Setup Motion Detection —
- Under the Motion tab Motion detection checkbox should be checked (motion detection is set by default).
- Set the Motion Step — the sample rate for motion analysis. With a motion step of 1, every frame will be analyzed. With a motion step of 3, every third frame will be analyzed and so on.
- Click Save button below the Schedule list to save the schedule item settings.
- Add more schedules for the camera or switch to the Camera Settings to select another camera to configure.
- The actual time between frames compared for motion detection will depend upon the FPS defined in the schedule.
— Continuous Recording with Motion Detection — Start or Synchronize Recording Services —
Setup Schedule-based Recording with Motion Detection
Start or Synchronize Recording Services
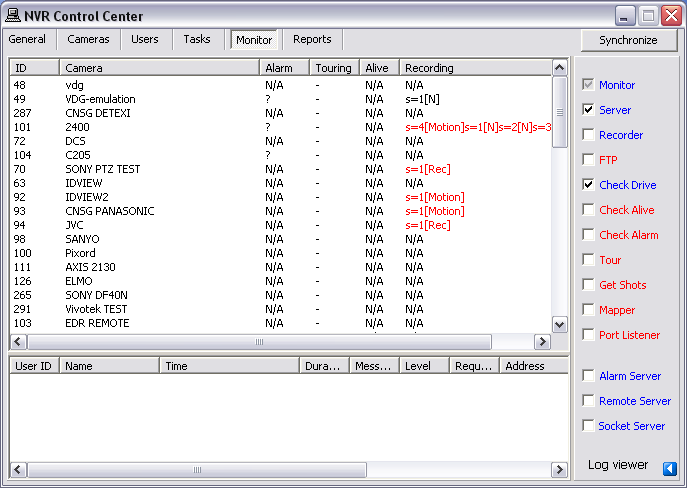
There are two NVR services that should be running and monitored by the
Monitor service in order to record —
Recorder and
Check Drive.
- In the NVR Control Center — Monitor the color of the service name indicates its status — blue while running , red while stopped.
- The checkbox next to a service name configures how it is affected by the Monitor service. If a service is checked, its status will be monitored and displayed.
To start or synchronize recording services —
- Go to NVR Control Center — Monitor.
- If the Recorder and Check Drive services were running and monitored during the configuration just click the Synchronize button to activate the new configurations.
If not — check Recorder and Check Drive checkboxes to enable monitoring and Monitor service will start them in approximately 30 seconds.
- If, for some reason, the user stops a service and it is selected to be monitored, it will be restarted by the Monitor service in approximately 30 seconds.
- During the system tuning you may need to disable restarting a service by the Monitor service. Uncheck the service checkbox to disable monitoring. Than you can click on the service name to turn it red to stop the service or blue — to run.


 DETEXI® Network Video Management System


