The following types of actions are available for configuration in a task —
Record Camera action records alarm video for a user-defined camera or for the camera associated with the event that triggered it. The length, picture quality, and camera position of the recording can be defined if desired. An alarm snapshot can also be taken by this task.
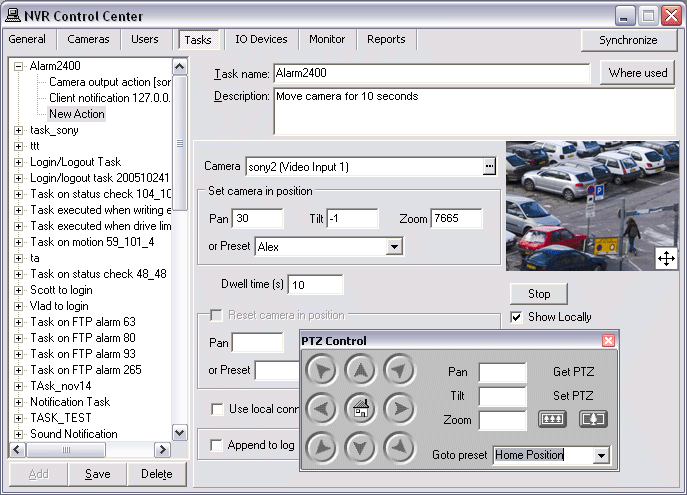
Move Camera action for PTZ cameras, moves a user-defined camera to a user-defined position or preset, and can dwell for a user-defined length of time before returning to another defined position if desired.
Video Popup action launches specified camera’s video streaming on the defined DETEXI Client computer. The Client must already be running on the defined computer.
Control Relay action controls the output relay of a specified camera — turn on, turn off, or activate for a user-defined length of time.
Control Tour action starts or stops a pre-configured tour on a specified camera for a user-defined period of time if desired.
Execute Program action executes an external program on the NVR Server, with user-defined parameters if desired.
To add new action to a previously created task —
Add New Action
In the NVR Control Center — Tasks select task from the Task list, right-click and choose New — Action option to add new action for selected task.
Select New — Action option, the actions menu appears.
Select the action to configure — Record Camera, Move Camera, Video Popup, Control Relay, Control Tour or Execute Program — right panel will be populated with configuration settings specific to this action.
Configure the selected action (refer to action specific information) and click Save button under the Task list to save the task configuration.
To add more actions to the task — with the same task selected in the Task list, right-click and choose New — Action; repeat the steps.
— Configure Action — Record Camera —
Configure Action
Record Camera
Record Camera action records alarm video for a user-defined camera or for the camera associated with the event that triggered it. The length, picture quality, and camera position of the recording can be defined if desired. An alarm snapshot can also be taken by this task.
When New — Action — Record Camera is selected the right panel will be populated with configuration settings specific to the Record Camera action.
Configure the action —
Define Camera
PTZ Camera Recording Position
Check Position with PTZ Control
Recording
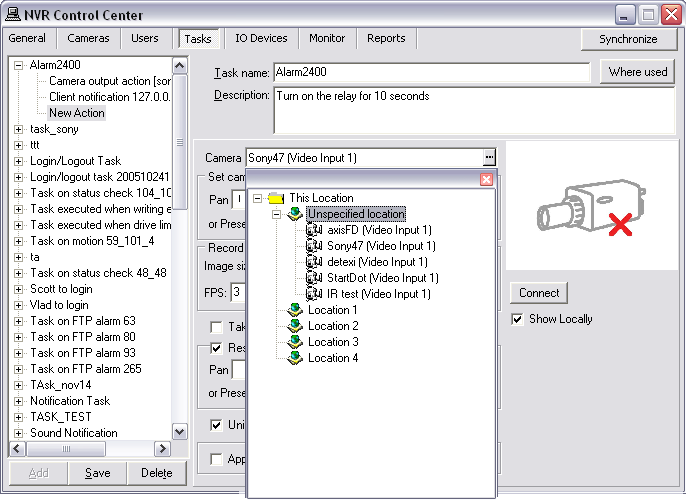
Choose camera to configure from the Camera drop-down list.
When camera is selected, click on the Connect/Stop toggle-button in order to connect to the selected camera (click again to disconnect). On successful connection live video from the camera will appear.
This connection is temporary and allows the camera’s settings to be configured and checked.
PTZ camera preset positions are only available if the connection is established.
Show Locally checkbox can be check to connect to the camera using local IP address and port number (during configuration time only).
Show Locally checkbox is only visible if camera has both an internal and external connections configured in the NVR Control Center — Cameras — Cameras Settings.
There are two NVR services that should be running and monitored by the Monitor service in order to record video — Recorder and Check Drive. All NVR services are visible and configurable in the NVR Control Center — Monitor
Recorder service records information and images from each video input into the NVR storage, according to the configured schedules, preferences, alarms and events.
Check Drive service monitors the condition of the storage path and device to confirm existence and available space for new video being recorded to the archive.
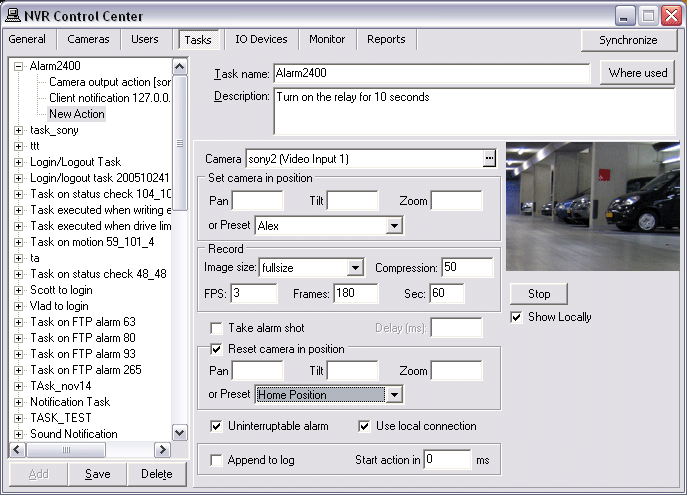
When alarm condition is detected a PTZ camera can move in a predefined position to record alarm video and than return to any other position if necessary. Both positions should be configured.
To setup camera recording position under the Set camera in position enter Pan, Tilt, Zoom parameters or select a preset position from Preset drop-down list.
If required to move camera to another position after the alarm video is recorded — check Reset camera in position checkbox and enter Pan, Tilt, Zoom parameters or select a preset position from Preset drop-down list below.
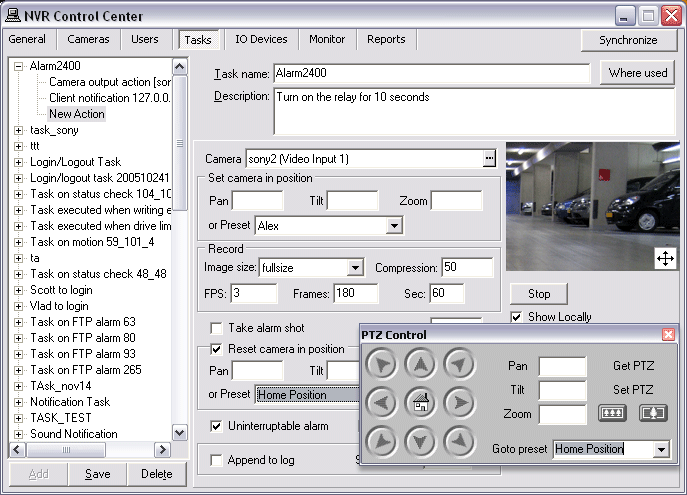
To bring up a PTZ control — roll over the image and click on the button in the bottom right corner.
Getting PTZ values of the current position of the camera click on Get PTZ.
Change camera PTZ values —
Use direction buttons and Home button on the left.
Or enter Pan, Tilt, Zoom values.
Use Zoom in/Zoom out buttons on the right of Zoom field.
Click on Set PTZ to set camera in a configured position.
Or select a preset position from drop-down list and click Go to Preset to set camera in the selected position.
In the Record section setup alarm video quality and duration —
Select Image size from the drop-down list; enter FPS and Compression %
Enter video duration in Frames or Sec (other parameter will be recalculated based on configured FPS)
Check Take alarm shot checkbox to take an alarm shot (optional).
If necessary, set a Delay (ms) time between alarm detection and camera alarm shot to allow a PTZ camera to move in the alarm recording position.
Check Uninterruptible alarm checkbox to prevent an alarm recording from the interruption by a new alarm (optional).
Check Use local connection checkbox to connect to the camera using local IP address/port number during Record Camera action.
The checkbox is only visible if the camera has both an internal and external connections configured in the NVR Control Center — Cameras — Cameras Settings
.
Check Append to log checkbox to append action specific information to the existing log file each time when the Record Video action is initiated.
If necessary, enter a Start action in time(ms) — a delay between alarm detection and action initialization.
In order to provide access control and activity (audit) logging the information about any action or notification initiated in the system can be appended to the system log.
There are two NVR services that should be running and monitored by the Monitor service in order to record video — Recorder and Check Drive. All NVR services are visible and configurable in the NVR Control Center — Monitor.
Recorder service records information and images from each video input into the NVR storage, according to the configured schedules, preferences, alarms and events.
Check Drive service monitors the condition of the storage path and device to confirm existence and available space for new video being recorded to the archive.
— Configure Action — Move Camera —
Configure Action
Move Camera
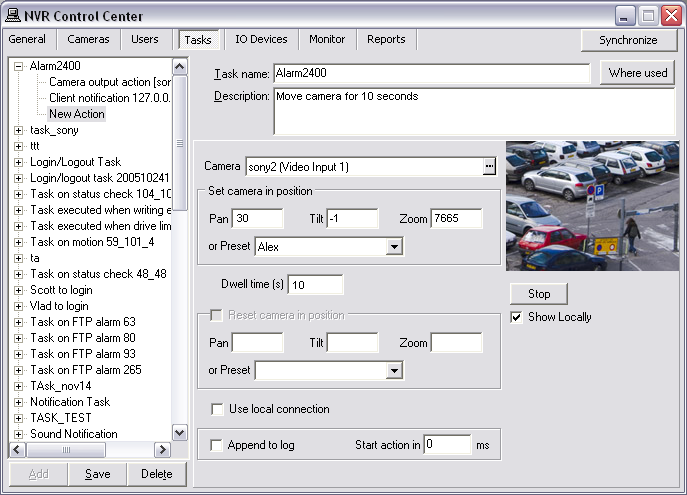
Move Camera action moves a user-defined PTZ camera to a user-defined position or preset, and can dwell for a user-defined length of time before returning to another defined position if desired.
When New — Action — Move Camera is selected the right panel will be populated with configuration settings specific to the Move Camera action.
Configure the action —
Define Camera
PTZ Camera Move Position
Check Position with PTZ Control
Other Parameters
Choose camera to configure from the Camera drop-down list.
When camera is selected, click on the Connect/Stop toggle-button in order to connect to the selected camera (click again to disconnect). On successful connection live video from the camera will appear.
This connection is temporary and allows the camera’s settings to be configured and checked.
PTZ camera preset positions are only available if the connection is established.
Show Locally checkbox can be check to connect to the camera using local IP address and port number (during configuration time only).
Show Locally checkbox is only visible if camera has both an internal and external connections configured in the NVR Control Center — Cameras — Cameras Settings.
When alarm condition is detected a PTZ camera can move in a predefined position, dwell a certain period of time and than return to any other position if necessary. Both positions should be configured.
To setup camera alarm position under the Set camera in position enter Pan, Tilt, Zoom parameters or select a preset position from Preset drop-down list.
Enter Dwell time (s).
To move camera to another position after the alarm — check Reset camera in position checkbox and enter Pan, Tilt, Zoom parameters or select a preset position from Preset drop-down list below (optional).
To bring up a PTZ control — roll over the image and click on the button in the bottom right corner.
Getting PTZ values of the current position of the camera click on Get PTZ.
Change camera PTZ values —
Use direction buttons and Home button on the left.
Or enter Pan, Tilt, Zoom values.
Use Zoom in/Zoom out buttons on the right of the Zoom field.
Click on Set PTZ to set camera in a configured position.
Or select a preset position from the drop-down list and click Go to Preset to set camera in the selected position.
Check Use local connection checkbox to connect to the camera using local IP address/port number during Move Camera action (optional).
The checkbox is only visible if the camera has both an internal and external connections configured in the NVR Control Center — Cameras — Cameras Settings
.
Check Append to log checkbox to append action specific information to the existing log file each time when Move Camera action is initiated (optional).
If necessary, enter a Start action in time(ms) — a delay between alarm detection and action initialization.
In order to provide access control and activity (audit) logging the information about any action or notification initiated in the system can be appended to the system log.
— Configure Action — Video Popup —
Configure Action
Video Popup
Video Popup action launches specified camera’s video streaming on the defined DETEXI Client computer. The Client must already be running on the defined computer.
When New — Action — Video Popup is selected the right panel will be populated with configuration settings specific to the Video Popup action.
Configure the action —
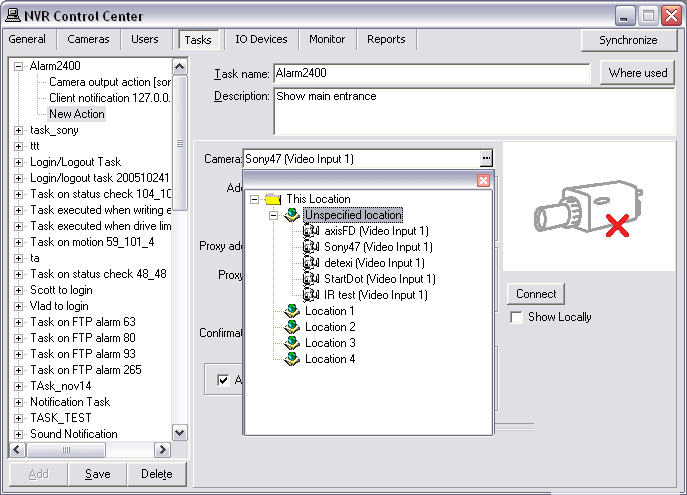
Define Camera
Define Remote Client
Video Popup on the Client
Choose camera to configure from the Camera drop-down list.
When camera is selected, click on the Connect/Stop toggle-button in order to connect to the selected camera (click again to disconnect). On successful connection live video from the camera will appear.
This connection is temporary and allows the camera’s settings to be configured and checked.
Show Locally checkbox can be check to connect to the camera using local IP address and port number (during configuration time only).
Show Locally checkbox is only visible if camera has both an internal and external connections configured in the NVR Control Center — Cameras — Cameras Settings.
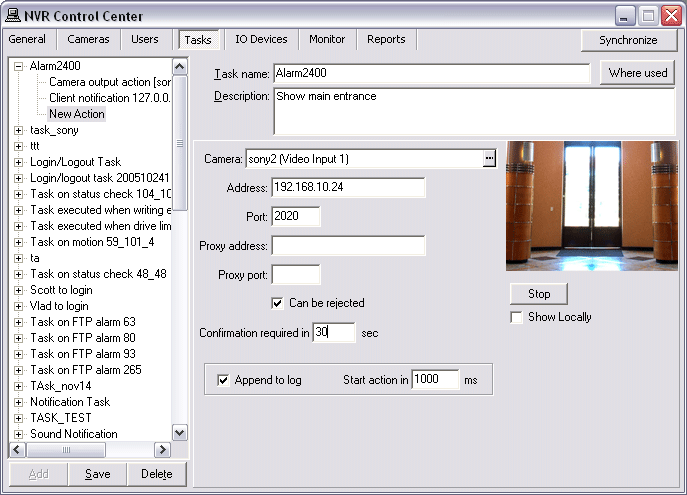
When the trigger condition is met a Video popup action alerts an operator by having a window with streaming video popup on a viewing terminal. A viewing terminal running the Remote DETEXI Client should be configured in the action.
Setup a viewing terminal Address and Port number.
Setup also Proxy Address and Proxy Port if necessary.
Check Can be rejected checkbox to allow operator to reject a video popup window (optional).
Yes/no question window. Continue based on answer.
To ask for a confirmation enter a waiting time in the Confirmation required in field (optional).
OK confirmation window. If not confirmed will be closed in configured time, information about missing confirmation recorded in a specific log, video popup will not appear.
Check Append to log checkbox to append action specific information to the existing log file each time when Video popup action is initiated (optional).
If necessary, enter a Start action in time(ms) — a delay between trigger condition detection and action initialization.
In order to provide access control and activity (audit) logging the information about any action or notification initiated in the system can be appended to the system log.
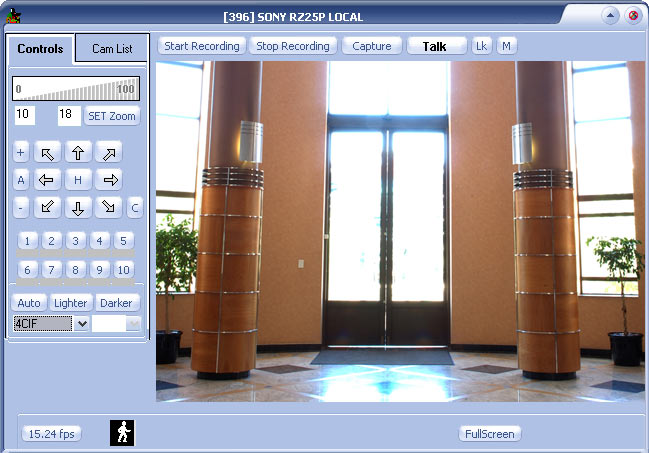
Video popup window is identical to the DETEXI Client single camera live view and has the same navigation and other capabilities as if the operator launched this view.
— Configure Action — Control Relay —
Configure Action
Control Relay
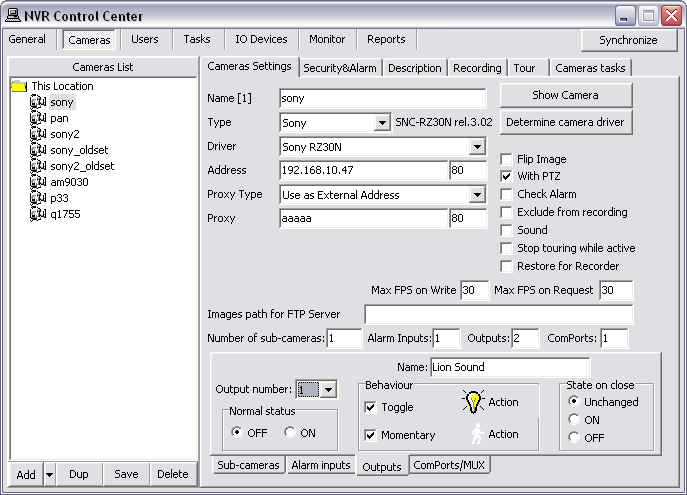
Any device that can toggle between an open and closed circuit can be connected to a network camera or a video encoder. Meanwhile, the main function of a network video product’s output port is to trigger external devices. Outputs enable the camera to control external devices by, for example, activating alarms, triggering door locks, generating smoke, or turning on lights. The Control Relay task triggers external devices (relays) by remote control from the DETEXI NVR.
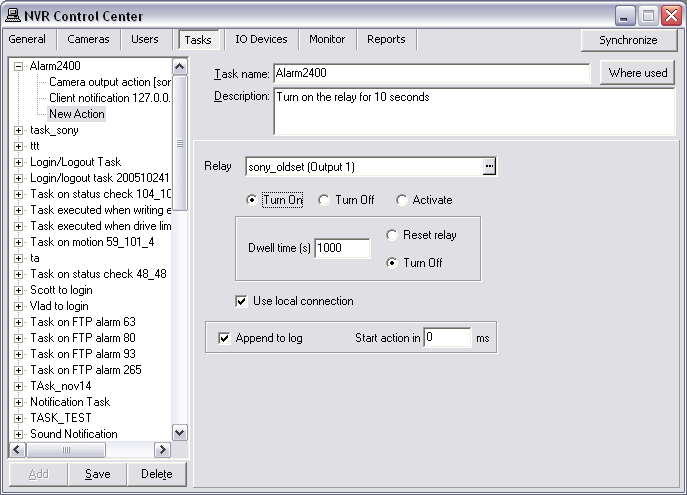
Control Relay action allows to control the output relay of a specified camera — turn on, turn off, or activate for a user-defined length of time.
When New — Action — Control Relay is selected the right panel will be populated with configuration settings specific to the Control Relay action.
Configure the action —
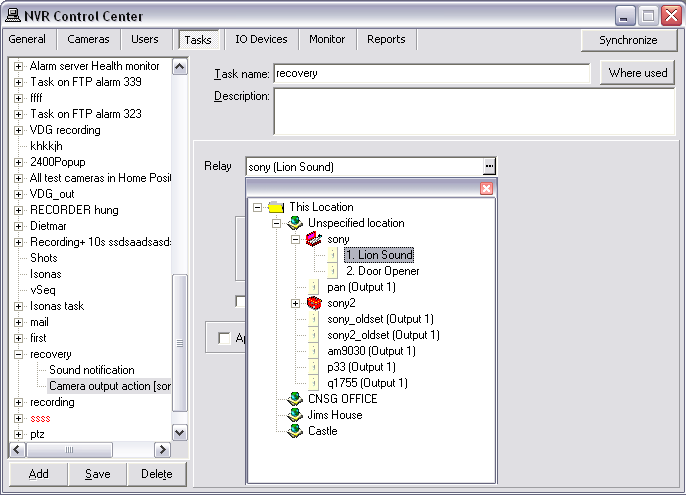
Define Relay
Set Parameters
Configure Camera Outputs
Select a relay to trigger (external device connected to the camera output port) from the Relay drop-down list.
IP device outputs are only available for the selection if previously configured in the NVR Control Center — Cameras — Cameras Settings — Outputs.
Toggle behavior settings —
Turn On — toggle the output to the ON state.
Turn On — Dwell — Reset Relay — toggle the output to the ON, wait for defined dwell time, than reset the output to previous state (before task was executed).
Turn On — Dwell — Turn Off — toggle the output to the ON, wait for defined dwell time, than reset the output to OFF(regardless of previous state).
Turn Off — toggle the output to the OFF state.
Turn Off — Dwell — Reset Relay — toggle the output to the OFF, wait for defined dwell time, than reset the output to previous state (before task was executed).
Turn Off — Dwell — Turn On — toggle the output to the OFF, wait for defined dwell time, than reset the output to ON(regardless of previous state).
Momentary behavior settings —
Activate — activate the momentary behavior defined for the camera output (turn on for defined period of time before turning back OFF).
Other parameters —
Check Use local connection checkbox to connect to the camera using local IP address/port number during Control Relay action (optional).
The checkbox is only visible if the camera has both an internal and external connections configured in the NVR Control Center — Cameras — Cameras Settings
.
Check Append to log checkbox to append action specific information to the existing log file each time when Control Relay action is initiated (optional).
If necessary, enter a Start action in time(ms) — a delay between trigger condition detection and action initialization.
In order to provide access control and activity (audit) logging the information about any action or notification initiated in the system can be appended to the system log.
IP device outputs are only available for the selection if previously configured for the camera in the NVR Control Center — Cameras — Cameras Settings — Outputs.
— Configure Action — Control Tour —
Configure Action
Control Tour
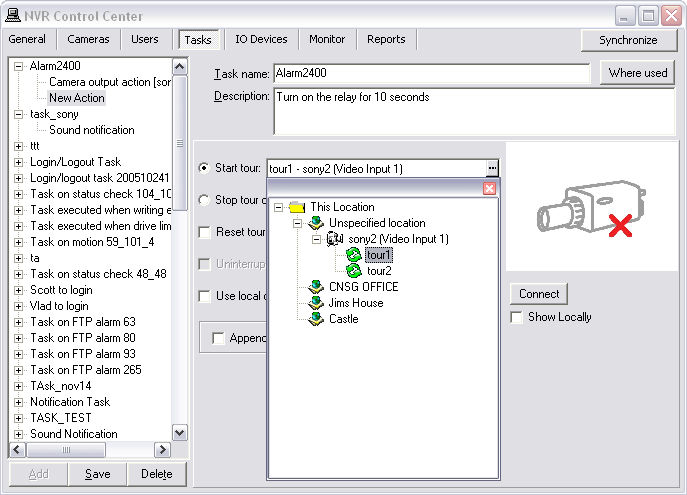
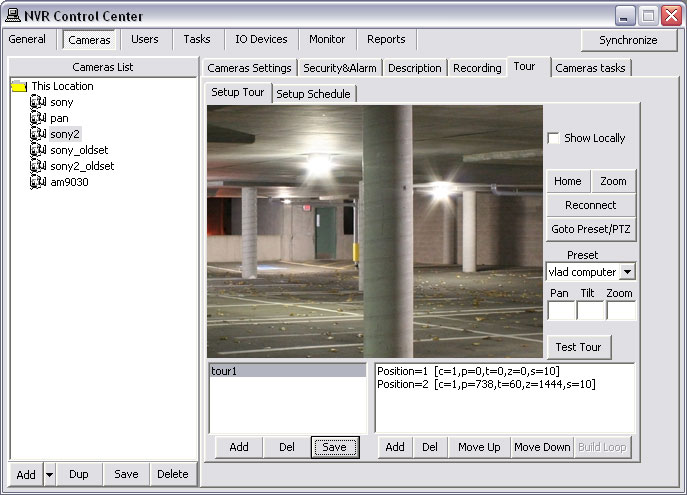
A tour enables PTZ camera to automatically move from one pre-configured position to the next in a predetermined order. The viewing time between one position and the next is configurable.
Control Tour — starts or stops a pre-configured tour on a specified camera for a user-defined period of time if desired.
When New — Action — Control Tour is selected the right panel will be populated with configuration settings specific to the Control Tour action.
Configure the action —
Define Tour
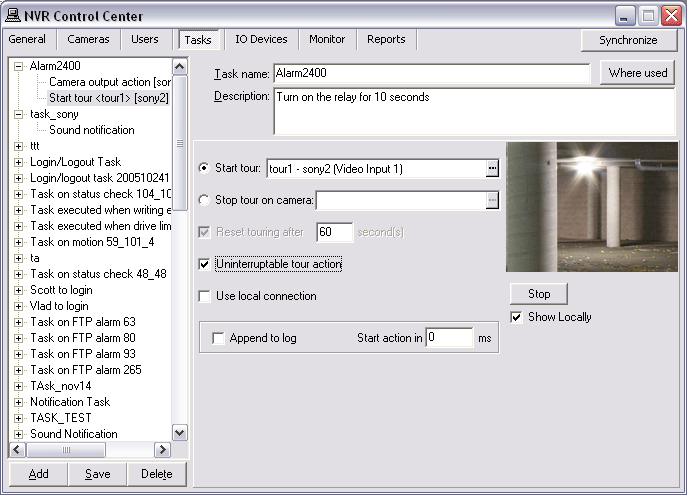
Start Tour
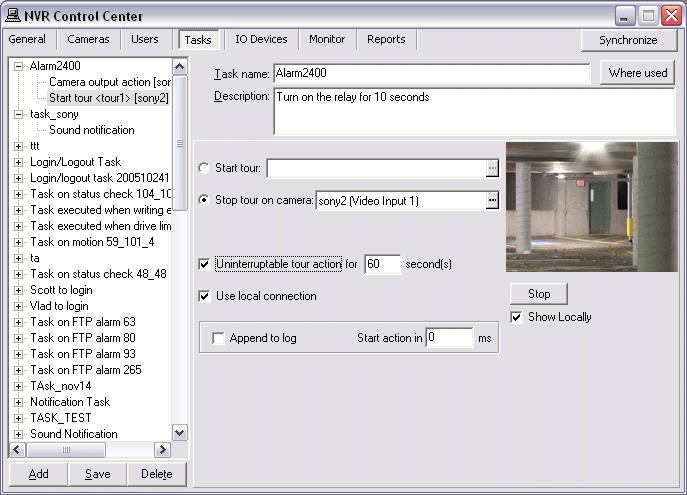
Stop Tour
Configure Tour
Select Start Tour or Stop Tour on Camera radio button to configure an appropriate Control Tour action.
Select camera’s pre-defined tour from the active drop down list.
A PTZ camera tours are only available for the selection if previously configured for the camera in the NVR Control Center — Tour — Setup Tour.
When tour is selected, click on the Connect/Stop toggle-button in order to connect to the selected camera (click again to disconnect). On successful connection live video from the camera will appear.
This connection is temporary and allows the camera’s tour settings to be configured and tested.
Show Locally checkbox can be checked to connect to the camera using local IP address and port number (during configuration time only).
Show Locally checkbox is only visible if camera has both an internal and external connections configured in the NVR Control Center — Cameras — Cameras Settings.
The DETEXI NVR Tour service should be running and monitored by the Monitor service in order to enable cameras touring. All NVR services are visible and configurable in the NVR Control Center — Monitor
Tour service moves PTZ cameras through a predefined series of locations according to defined schedules or on alarms or events.
If Start Tour is configured — when the trigger event is met the camera starts touring from one pre-configured position to the next in a predetermined order.
Start Tour settings —
Select Start Tour radio button and camera’s pre-defined tour from the active drop down list.
Setup Reset touring after (sec) time to reset camera position according to the normal schedule when time expires (optional).
If reset time is configured the Uninterruptible tour action checkbox can be checked to prevent an alarm tour from the interruption by a new alarm.
Other parameters —
Check Use local connection checkbox to connect to the camera using local IP address/port number during Control Tour action (optional).
The checkbox is only visible if the camera has both an internal and external connections configured in the NVR Control Center — Cameras — Cameras Settings
.
Check Append to log checkbox to append action specific information to the existing log file each time when Control Tour action is initiated (optional).
If necessary, enter a Start action in time(ms) — a delay between trigger condition detection and action initialization.
In order to provide access control and activity (audit) logging the information about any action or notification initiated in the system can be appended to the system log.
If Stop Tour is configured — when the trigger event is met the camera stops in the current position until new alarms/events occur.
Stop Tour settings —
Select Stop Tour on Camera radio button and camera’s pre-defined tour from the active drop down list.
The Uninterruptible tour action checkbox can be checked to prevent a camera stop position being changed by the new alarms/events before specified time expires.
Other parameters —
Check Use local connection checkbox to connect to the camera using local IP address/port number during Control Tour action (optional).
The checkbox is only visible if the camera has both an internal and external connections configured in the NVR Control Center — Cameras — Cameras Settings
.
Check Append to log checkbox to append action specific information to the existing log file each time when Control Tour action is initiated (optional).
If necessary, enter a Start action in time(ms) — a delay between trigger condition detection and action initialization.
In order to provide access control and activity (audit) logging the information about any action or notification initiated in the system can be appended to the system log.
A PTZ camera tours are only available for the selection if previously configured for the camera in the NVR Control Center — Tour — Setup Tour.
The DETEXI NVR Tour service should be running and monitored by the Monitor service in order to enable cameras touring. All NVR services are visible and configurable in the NVR Control Center — Monitor
Tour service moves PTZ cameras through a predefined series of locations according to defined schedules or on alarms or events.
— Configure Action — Execute Program —
Configure Action
Execute Program
The execute program action allows you to execute any external program to do whatever you want and is limited only by your imagination and the resources required to develop it.
Execute Program action executes an external program on the NVR Server, with user-defined parameters if desired.
When New — Action — Execute Program is selected the right panel will be populated with configuration settings specific to the Execute Program action.
Configure the action —
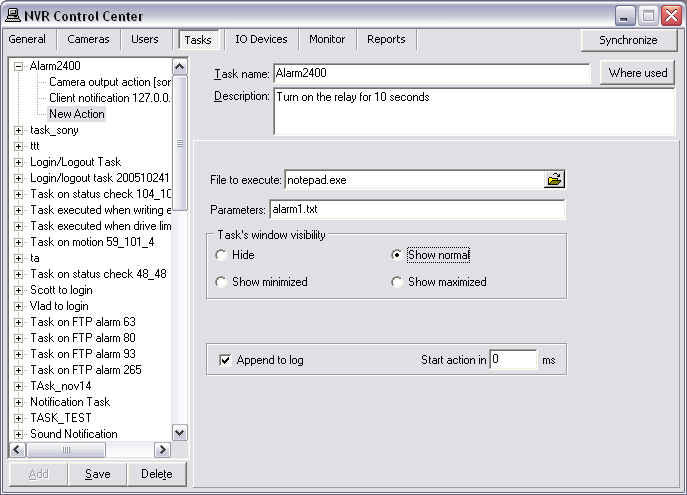
Define Program to Execute
When the trigger condition is met an Execute Program action starts a defined program execution. The input parameters must be provided if necessary.
Enter the program name in the File to execute or press the browse button and browse to the directory containing the file.
Enter space-separated input parameters (if any) in the Parameters.
Under the Task’s window visibility select Hide, Show minimized, Show normal or Show maximized option.
Check Append to log checkbox to append action specific information to the existing log file each time when Execute Program action is initiated (optional).
If necessary, enter a Start action in time(ms) — a delay between trigger condition detection and action initialization.
In order to provide access control and activity (audit) logging the information about any action or notification initiated in the system can be appended to the system log.


 DETEXI® Network Video Management System