— Administration and Management — NVR Control Center —
Administration and Management
NVR Control Center
The underlying structure of the DETEXI NVR software consists of many individual services, which allow execute and organize all the tasks it is responsible for.
All dialogs that allow control and configuration of all aspects of the DETEXI NVR are found under the
NVR Control Center — the DETEXI NVR graphic interface that servs as a communication tool between the
DETEXI NVR and
system administrator.
|
|
|
 |
To Launch the DETEXI NVR Control Center —
Open DETEXI NVR Control Center from Start — All Programs or click the program icon on your desktop.
|
|
|
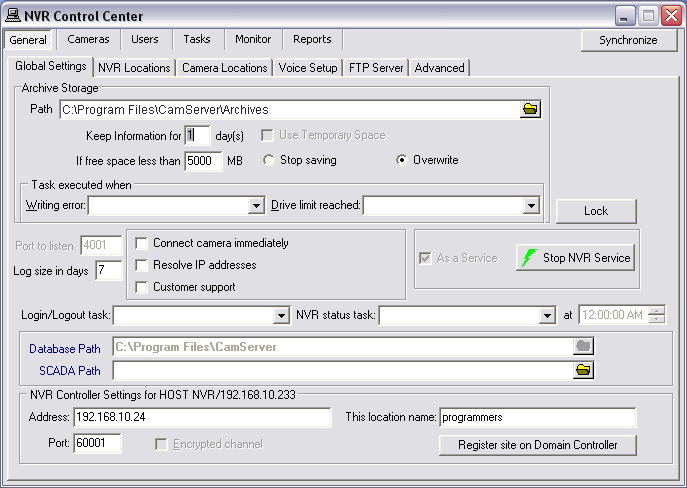
Default Opening Location —
When the NVR Control Center is launched General — Global Settings is the default opening location. Some settings have default values at first, but before the NVR is used for recording, these settings will need to be tailored to the specific application needs based on recording specifications and resources available.
- The Monitor service is an internal service to start/stop other DETEXI NVR services.
- The Monitor service is started and stopped using the Start/Stop NVR Service toggle button in the NVR Control Center — General — Global Settings.
|
|
— Administration and Management — NVR Advanced Settings —
Administration and Management
NVR Advanced Settings
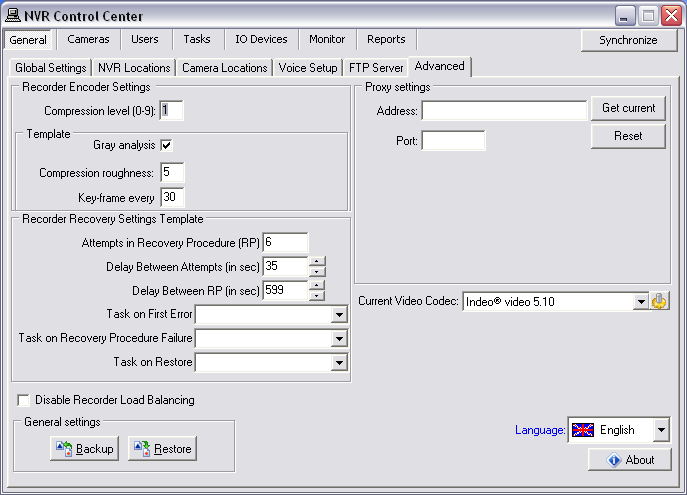
Proxy Settings
If a company uses Web-Proxy Server that requires
authentication to get to the Internet, proxy setting
must be done.
Get Current button helps to get the information about
current domain, computer and user names.
Recorder Encoder Settings
Configurable Encoder is available in the DETEXI NVR 5.5. When enabled, compression in the NVR involves finding the difference between two images in the video stream and then applying a compression algorithm.
In the upcoming DETEXI NVR 5.6 release for optimized quality and bandwidth MPEG-4 and highly efficient H.264 video compression will be supported.
- To learn more read the Compression section.
Recorder Recovery Settings Template
One of the methods to deal with IP-devices errors is to setup a
Recovery Procedure inside a camera recording schedule. This procedure fully describes how the Recorder will manage the faulty camera.
- To learn more read the Reliability System — Setup Health Monitoring section.
General Settings Backup/Restore
- Click Backup button to backup NVR general settings
- Click Restore button to restore previously saved settings
Current Video Codec
Codec selected from the
Current Video Codec list is used as a default by internal automated conversion procedure in order to create an alarm video AVI file on the client request. Still another codec could be selected directly in the DETEXI Client.
Language Selection
Select your preferred language. English is recommended. Dutch and Swedish now under construction.
- NVR Advanced Settings
- About NVR
- Detailed Info
To setup NVR Advanced Settings —
- In the NVR Control Center go to the General — Advanced.
In order to get the DETEXI NVR registration and license information —
- In the NVR Control Center — General — Advanced click About button — the DETEXI NVR About splash screen appears.
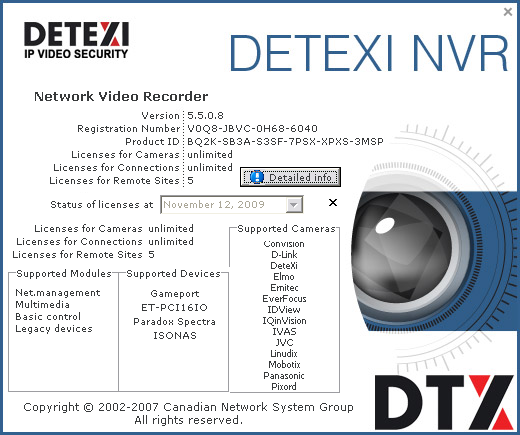
- To get more detailed information click the Detailed Info button on the splash screen.
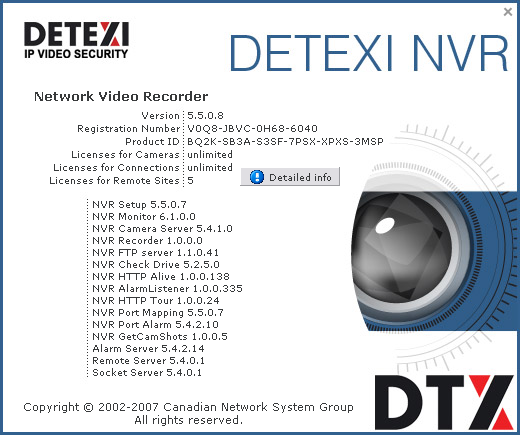
Detailed information includes Supported Modules, Supported Devices and Supported Cameras lists.
— Administration and Management — Service Status —
Administration and Management
Service Status, Start/Stop NVR Service
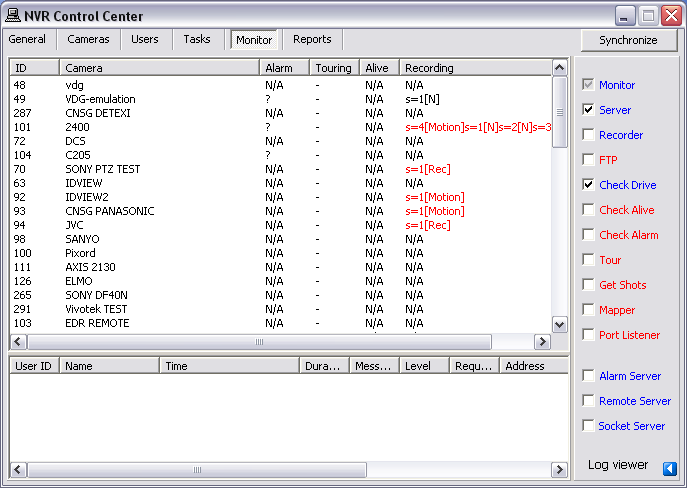
All DETEXI NVR services are visible and configurable in the
NVR Control Center — Monitor. The status of all the cameras that have been installed can be seen there as well.
- The color of the service name indicates its status — blue while running , red while stopped.
- Click on any service name to turn it red to stop the service or blue — to run.
The Monitor service is an internal service to
start/stop other DETEXI NVR services. It is also responsible for
monitoring the health and status of all NVR Services.
- The checkbox next to a service name configures how it is affected by the Monitor service. If a service is checked, its status will be monitored and displayed.
- The Monitor service is started and stopped using the Start/Stop NVR Service toggle button in the NVR Control Center — General — Global Settings.
- Checked services will also be started/stopped along with the Monitor service.
Runtime Configuration, Synchronization
For most system settings, the NVR services support
runtime configuration . This means that changes can be made to cameras, users, etc. without stopping the NVR Services. When you are ready for your changes to take effect, you should
synchronize the services with the current configuration. The
Synchronize button is found in the upper right-hand corner of the NVR Control Center, no matter what page is active.
View System Log
To view log messages that the system components write to a common log file click
Log viewer at the bottom right corner.
- It is recommended that the Monitor service be active at all times.
- System will check status only for the components with the checkbox checked.
- If, for some reason, the user stops a service and it is selected to be monitored, it will be restarted by the Monitor service in approximately 30 seconds.
- During the system tuning you may need to disable restarting a service by the Monitor service. Uncheck the service checkbox to disable monitoring. Than you can click on any service name to turn it red to stop the service or blue — to run.
— Administration and Management — Turn On/Off Services —
Administration and Management
Turn On/Off Services
The unnecessary services can be
turned off to preserve system resources. It is recommended that the Monitor service be active at all times.
Checked services
(with checked checkbox next to the service name) will be monitored and started/stopped along with the Monitor service.
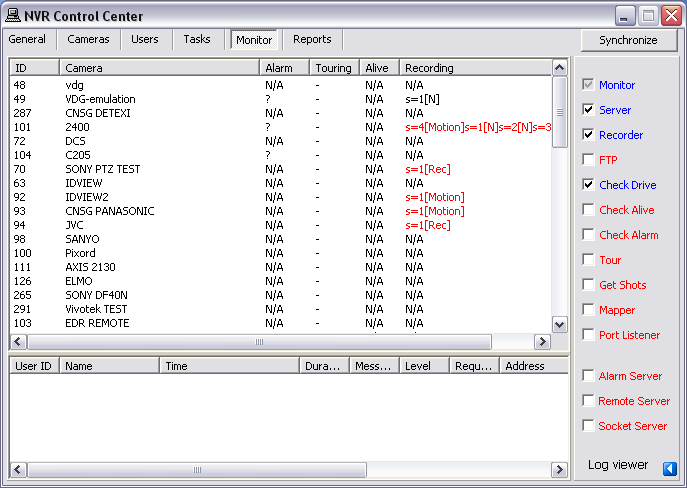
To run/monitor, for example, just authentication and recording NVR services —
- In the NVR Control Center — Monitor uncheck all services except Server, Recorder and Check Drive to enable their monitoring.
- Click on the service names to turn the Server, Recorder and Check Drive names blue and all others — red. This turns off the unnecessary services while keeps running the authentication and recording services.
- Click Synchronize button to activate the new configurations.
- Server service authenticates remote users connected to the NVR through the Remote DETEXI Clients. It is also responsible for tracking statistics about the remote user’s connections.
- Recorder service records information and images from each video input into the NVR archive, according to the configured schedules, preferences, alarms and events.
- Check Drive service monitors the condition of the storage path and device to confirm existence and available space for new video being recorded to the archive.
— Administration and Management — Setup NVR Status Task —
Administration and Management
Setup NVR Status Task
DETEXI IP-Surveillance reliability checking is based on the Task Execution Engine. If something happens to the system, hardware or one of the NVR services, certain task assigned to this event is executed.
What if something happens to the Task Execution Engine by itself?
The obvious conclusion is — you will never have any task executed at all and you will never know that something is wrong with the system. To solve this issue a special
NVR Status Task was developed which
(if assigned) is executed once a day at a time you can predefine by yourself. If this task HAS NOT BEEN executed at that time it means you have to check the system.
- The purpose of the NVR Status task is to send out the current status of the NVR services at predefined time.
It is initiated once a day at a predefined time and provides the user a list of the NVR services being monitored and their status.
Setup NVR Status Task
- In the NVR Control Center go to the General — Global Settings.
- Select an appropriate predefined task from the NVR status task drop-down list.
- Set a desired time.
- If you want to setup your own schedule with a different time interval (twice a day or once a week or whatever you want) to send out notification that the NVR is alive, you should create a Scheduled Task and use it for checking if the Reliability System is functioning properly.


 DETEXI® Network Video Management System


