A network camera has its own IP address. It is connected to a network and has a built-in Web server, FTP server, FTP client, e-mail client, alarm management, programmability, and much more. A network camera operates as an independent server on a network and can be placed wherever there is an IP network connection.
The File Transfer Protocol (FTP) is a network protocol for data transmission via TCP/IP. It primarily is used to transmit files from a server to a client (download) or from a client to a server (upload).
Network cameras or video encoders (video servers) can use FTP to transmit JPEG images or MPEG-4 video sequences to an FTP server for archiving purposes. In such a case, the network camera acts as an FTP client and establishes an event-based connection to the FTP server. It then transmits multiple JPEG images to the server and stores them to a specific directory using different file names.
The DETEXI NVR has its own FTP server and can receive these images and incorporate them into the Archive just like any streamed recording.
Allowing the alarm processing to be done on the camera, removes the need to constantly stream video to the NVR.
With such "bursts" of high quality video triggered by alarms low bandwidth networks such as wireless radios can be successfully used.
A secure communication with network cameras is created by providing some kind of identity — through a username and password to the camera and the DETEXI NVR. If authentication authorized and accepted, that is, verifying whether the device has the authority to operate as requested, the device is fully connected and operational in the system. This allows protecting the camera from an attacker who knows camera’s IP address.
To configure a network camera on detecting an alarm or event to deliver images sequentially to an FTP server the set-up wizard in the product should be used.
The FTP Server NVR service should run and be monitored. FTP Server service receives images from cameras via FTP and writes them into the NVR archive. It also raises an alarm when such images are received from a camera, and can also be used for FTP notification of IP address changes from the camera to the NVR.
— FTP Pushed Video — Setup FTP Pushed Video —
FTP Pushed Video
Setup FTP Pushed Video
Network cameras or video encoders can use FTP to transmit images to an FTP server. In such a case, the network camera acts as an FTP Client and establishes an event-based connection to the FTP server. The DETEXI NVR has its own FTP server and can receive these images and incorporate them into the NVR archive just like any streamed recording.
A secure communication with network cameras is created by providing some kind of identity — through a username and password to the camera and the DETEXI NVR. If authentication authorized and accepted, that is, verifying whether the device has the authority to operate as requested, the device is fully connected and operational in the system. This allows protecting the camera from an attacker who knows camera’s IP address.
To configure a network camera on detecting an alarm or event to deliver images sequentially to an FTP server the set-up wizard in the product should be used.
The FTP Server NVR service should run and be monitored. FTP Server service receives images from cameras via FTP and writes them into the NVR archive. It also raises an alarm when such images are received from a camera, and can also be used for FTP notification of IP address changes from the camera to the NVR.
Setup NVR FTP Server
Camera FTP Setting in the NVR
File Filtering
Setup Action on FTP Alarm
Setup NVR FTP Server
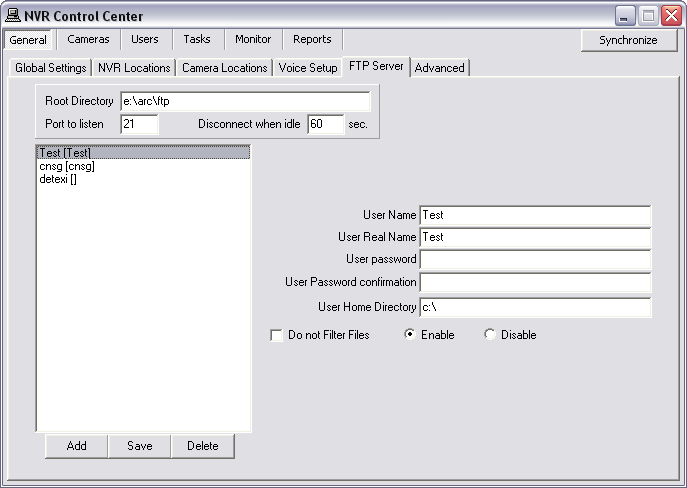
In the NVR Control Center go to the General — FTP Server.
Define the Root Directory on the NVR FTP Server.
Enter Port to listen number and specify Disconnect when idle time.
Click the Add button below the users list to create a new user.
Enter User Name and Password — for the camera’s FTP connection authentication.
Even though a specific username/password can be used for each network camera, the same username/password can also be used for all of them.
Proper authentication information must be provided to the cameras.
Leave the User Home Directory (standard FTP Server setting) blank — images from each camera will be saved in a subfolder, named based on the Images path for FTP Server camera’s setting.
During normal operation the Do not Filter Files checkbox must be unchecked.
Any user from the users list could be temporarily disabled by selecting Disable radio button.
Camera FTP Setting in the NVR
To define where the images FTP’ed from an IP device will be stored when uploaded —
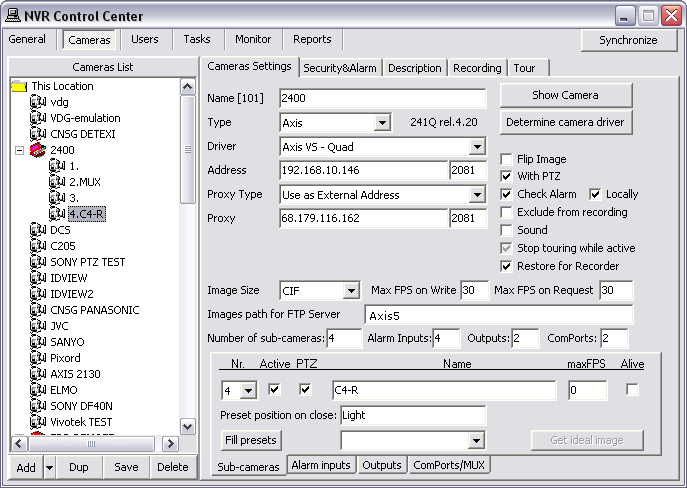
In the NVR Control Center — Cameras select camera to configure from the Cameras List and switch to the Recording.
Enter the Images path for FTP Server . The images FTP’ed from the camera will be saved in this folder in the FTP Server Root Directory, specified in the General — FTP Server.
The same path must be setup in the IP device built-in FTP Client for the FTP’ed files upload path.
File Filtering
In the NVR Control Center — General — FTP Server during normal operation the Do not Filter Files checkbox must be unchecked.
In this case, when the images are uploaded and saved in the Root Directory subfolders the NVR immediately filters those files to determine weather they belong in the NVR Archive based on their file names. If any file name does not make sense to the NVR, the file will be thrown out rather than integrated into the archive.
The IP device FTP Client should be setup for proper file naming. The file names must be of the correct format, which the NVR understands.
File filtering can be temporarily disabled, allowing you to ensure that files are being uploaded to the NVR FTP Server properly.
To temporarily disable file filtering check the Do not Filter Files checkbox.
Be sure to turn the file filtering back on, or images will not be recorded to the NVR Archive.
Setup Action on FTP Alarm
In some wireless configurations, and other environments where constant streaming is not possible, video can be uploaded via FTP based on decision making within the IP-device. When video is uploaded to the DETEXI NVR FTP Server, the video is merged into the archive as alarm video, and the FTP Alarm event is raised.
To setup an action to be executed on the FTP Alarm a previously created task should be assigned to the event —
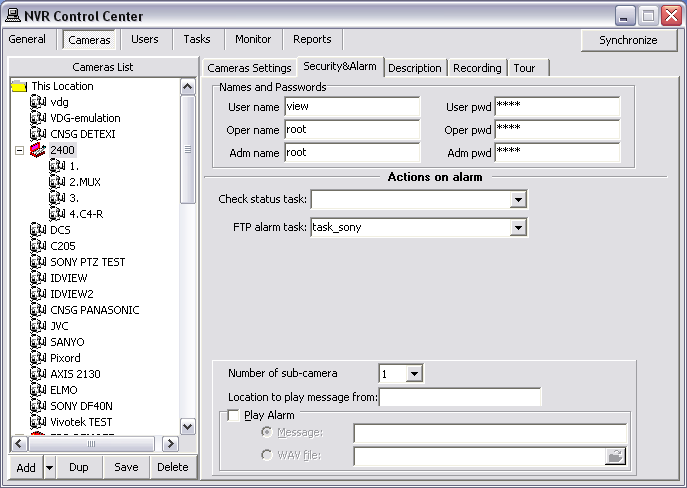
In the NVR Control Center — Cameras select a camera from the Cameras List.
Switch to the Security & Alarm.
Under the Actions on Alarm select an appropriate predefined task from the FTP Alarm Task drop-down list.
Click Save button below the Cameras List to save settings.
Each individual event can only have one task assigned to it.
Any task can include one or more actions/notifications, allowing for multiple things to happen when a single alarm or event is raised.
An event can also have a composite task assigned to it. Any composite task consists of several predefined tasks of the user’s choice.
— FTP Pushed Video — Setup Camera Built-in FTP Client —
FTP Pushed Video
Setup Camera Built-in FTP Client
Network cameras or video encoders can use FTP to transmit images to an FTP server. In such a case, the network camera acts as an FTP Client and establishes an event-based connection to the NVR FTP Server.
To setup camera built-in FTP Client follow the instructions in the manual specific to the type of camera.
Proper authentication information must be provided to the cameras as it was setup in the NVR Control Center — General — FTP Server.
The same path must be setup for the FTP’ed files upload path in the IP device built-in FTP Client that was specified in the Images path for FTP Server camera setting in the NVR Control Center — Cameras — Recording.
Even though some cameras can have up to 4 I/O ports, only one particular port can be associated with the FTP.
Since the network cameras do not have a standard format for the FTP sequence file names, different names for the different camera types must be setup as provided in the following table to make sense to the DETEXI NVR.
CAMERA TYPE
FTP SEQUENCE FILE NAME (BASE)
AXIS 2120
alarm_cam1
AXIS 2130
alarm
AXIS 2400
alarm alarm_cam[X] for firmware older than 2.20
AXIS 2401
alarm_cam1
AXIS firmware release from 4.00 and higher
alarm_cam[X]_%y%m%d_%H%M%S_#s.jpg ([X] — port number for the device)
SONY
asony
JVC
alarm_jvc
Panasonic KX-HCM280
alarm_pan1_
(with date/time suffix and path: /Panason/alarm_pan1_ in prefix)
IQeye
alarm_IQ_$SD.$ST.$FN (under the Trigger Settings)
Lumenera
alarm_cam1_%Y_%m%d_%H%M%S_%%04i.jpg (under the Alarms — Path Settings )
Panasonic and AXIS cameras must be set for 24H in the Time Settings.
Instead of alarm, it could be raise string in Base File Name settings. In this case FTP server acts like IOListener letting Recorder know that alarm is raised on the camera.
If the NVR FTP Server receives two or more ftp sequences from the same camera within one minute, the alarm will be raised only once, nevertheless all ftp sequences will be saved properly.
— FTP Pushed Video — Enable NVR FTP Server Log Files —
FTP Pushed Video
Enable FTP Server Log Files
To provide assistance for testing and troubleshooting the NVR FTP Server log files should be enabled.
Error.log file will only be created if there are errors to report.
Debug.log file will contain basic alarm information for each upload.
Trace.log file will contain verbose logging information for the FTP Server, including user activity as well as every file uploaded.
By default, the DETEXI NVR components and files are installed in the C:/Program Files/CamServer folder. All configuration databases, media, programs and log files are stored here.
Enable NVR FTP Server Log Files
View User Info
Enable FTP Server Log Files
The FTP Server service should be running and monitored in order to upload the files FTP-ed from the network cameras. When the service is running the NVR FTP Server icon will appear in the System Tool Tray.
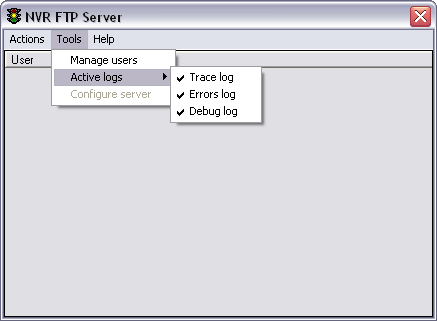
Double-click the NVR FTP Server icon — the NVR FTP Server interface will launch.
Switch to the Tools — Active Logs and select log files to be written.
View User Info
To view the information about users in the NVR network —
Double-click the NVR FTP Server icon — the NVR FTP Server interface will launch.
Switch to the Tools — Manage Users to view users list.


 DETEXI® Network Video Management System


 A network camera has its own IP address. It is connected to a network and has a built-in Web server, FTP server, FTP client, e-mail client, alarm management, programmability, and much more. A network camera operates as an independent server on a network and can be placed wherever there is an IP network connection.
The File Transfer Protocol (FTP) is a network protocol for data transmission via TCP/IP. It primarily is used to transmit files from a server to a client (download) or from a client to a server (upload).
Network cameras or video encoders (video servers) can use FTP to transmit JPEG images or MPEG-4 video sequences to an FTP server for archiving purposes. In such a case, the network camera acts as an FTP client and establishes an event-based connection to the FTP server. It then transmits multiple JPEG images to the server and stores them to a specific directory using different file names.
The DETEXI NVR has its own FTP server and can receive these images and incorporate them into the Archive just like any streamed recording.
A network camera has its own IP address. It is connected to a network and has a built-in Web server, FTP server, FTP client, e-mail client, alarm management, programmability, and much more. A network camera operates as an independent server on a network and can be placed wherever there is an IP network connection.
The File Transfer Protocol (FTP) is a network protocol for data transmission via TCP/IP. It primarily is used to transmit files from a server to a client (download) or from a client to a server (upload).
Network cameras or video encoders (video servers) can use FTP to transmit JPEG images or MPEG-4 video sequences to an FTP server for archiving purposes. In such a case, the network camera acts as an FTP client and establishes an event-based connection to the FTP server. It then transmits multiple JPEG images to the server and stores them to a specific directory using different file names.
The DETEXI NVR has its own FTP server and can receive these images and incorporate them into the Archive just like any streamed recording.